Key Takeaways
- No single clue tells the full story. Combine what you see and smell with notes on water, odors, wood condition, insulation, and exterior context before forming an opinion.
- Differentiate liquid water, dampness, capillary moisture, vapor diffusion, condensation, and humidity. They can overlap, yet each behaves differently.
- Musty smells, visible mold, damp materials, rust, staining, and condensation are conditions to document and examine further.
- Suspected wood decay, signs that may indicate wood-destroying insects, widespread visible growth, or substantial or recurring water issues merit qualified help.
- Track timing, location, weather, and recurrence. Patterns guide an assessment, but they are not proof of cause.
What Crawl Space Damage Can Look Like
A visible clue is evidence to investigate, not a diagnosis
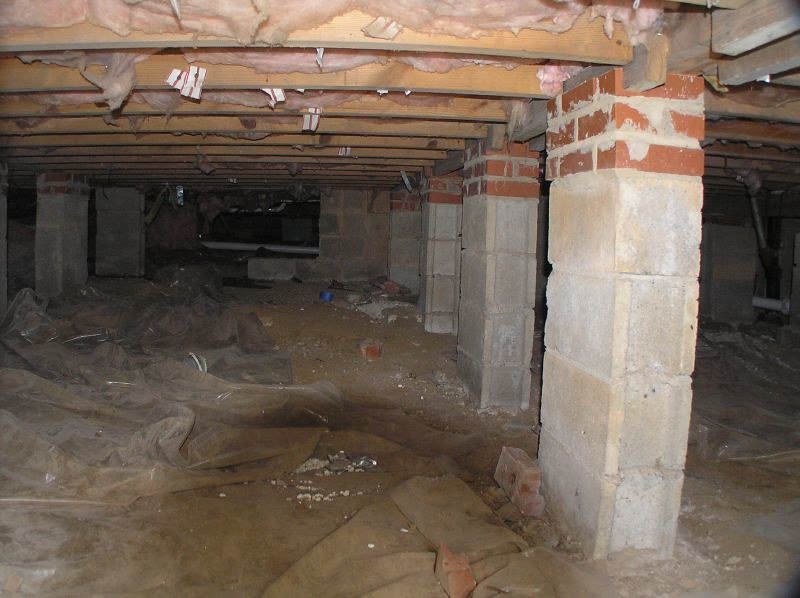
Most homeowners first spot trouble through practical clues such as a puddle after a storm, a musty draft, darkened joists, a drooping batt of insulation, or a faint mineral line on masonry. These details matter, but one snapshot cannot diagnose a building or pinpoint a source. Conditions in a crawl space swing with seasons, storms, and indoor use, so a single visit may overstate or understate what is typical. Use what you can safely see, smell, or photograph to build a record rather than to decide on a cause or a fix on the spot. This guide focuses on recognition and documentation and leaves conclusions and remedies to qualified evaluations.
Keep two working goals. First, learn to tell moisture types and material changes apart. Second, note where you see them and when. Moisture can arrive as liquid water, wick upward through porous materials by capillary action, pass as vapor, or condense from humid air on cooler surfaces. Wood and insulation may show effects differently, and odors can be present even when nothing obvious is visible. Your notes on timing, location, weather, and whether signs recur add context for an assessment without boxing you into a narrow interpretation.
Why moisture, wood, insulation, and floor clues can overlap
A crawl space sits between the ground and the rooms above, partly connected to outdoors and partly to the house. Overlap is normal. Warm, humid air hitting cooler framing or the underside of insulation can leave beads of water. A plumbing drip or roof runoff can create a localized wet patch or a shallow puddle. One area of wood may carry surface mold or stains while still sound, yet nearby insulation may sag after getting wet.
Materials interact. Moisture lingering near the ground can raise relative humidity and make condensation on metal pipes or cooler portions of the floor assembly more likely. Wet insulation can hold dampness against wood. Floors above may change feel or shape even when the crawl space does not look obviously wet. Expect overlap, and connect observations without assuming a single cause.
Timing, location, and repeat patterns add useful context
The same crawl space looks different after a thunderstorm, during a summer heat wave, and during a cool, dry spell. Record when you see water, dampness, or condensation, and pair those notes with the weather. If odors intensify after wet weather or during humid periods, write that down. Track whether the same corner, wall, pier, or pipe shows repeated dampness or staining.
Patterns help frame likely pathways. Puddles that appear only after heavy rain point toward liquid water entry. Beads of water on cold pipes during muggy weather point toward condensation. Treat patterns as guideposts, not proof. Use them to decide what else to photograph and where to look next.
Water and Moisture Signs in a Crawl Space
Standing water, puddles, wet soil, and fresh dampness
Liquid water is the most direct sign to document. Look for standing water, shallow puddles, or visibly wet soil or ground cover. Waterlines on piers or walls can show prior high points. Fresh dampness often appears as a darker patch that lightens as it dries. These observations point to liquid water movement, not general humidity or vapor alone.
Record where you see water, roughly how far it extends, and when it appears. Note whether it follows a storm, aligns with a known plumbing fixture, or shows up near a hatch, wall, or utility penetration. Pooled water may look clear, cloudy, or discolored. If you suspect sewage or other contamination, do not disturb it and seek qualified help. Whether small or broad, visible water should be photographed and logged.
Condensation on pipes, insulation, or framing
Condensation forms when humid air meets a cooler surface. In crawl spaces, it can appear as droplets or a thin film on cold water lines, ducts, the underside of insulation, or shaded wood members. Under certain conditions, it becomes visible on plastic-faced insulation or paper backings and may dampen exposed portions of joists and subfloor.
Write down the exact surfaces where you see condensation and the weather at the time. It commonly increases during warm, humid stretches and eases during cooler, drier weather. Note whether droplets persist, bead and drip, or dry quickly. Condensation is distinct from leaks or liquid entry, although repeated condensation can keep adjacent materials damp.
Damp masonry, stains, mineral deposits, and rust
Masonry often tells a moisture story. Darkened areas on foundation walls or piers can indicate recent wetting. White, powdery mineral deposits and crusty lines form as water evaporates and leaves salts behind. Those deposits can mark cycles of wetting and drying and may be present with or without current dampness.
Metal provides clues, too. Rust on hangers, straps, ducts, or fasteners points to repeated moisture exposure. Rust alone does not identify a source, but it is worth recording. Keep the sign separate from the cause: dampness is not the same as liquid entry, and mineral deposits are not the same as an active leak. Photograph the surface, note the extent, and capture the conditions present when you observed them.
Water-damaged ground cover and stored materials
Ground cover and stored items can reveal past water or persistent humidity. Torn or displaced ground cover, floating debris after rain, or a silt layer signals prior water movement. Cardboard, fabrics, and wood placed on the ground may warp, stain, or smell musty after absorbing moisture. Corrosion on low-stored tools or fasteners is another sign to note.
These clues add context rather than pinpoint a source. Photograph items in place, and note whether damage is isolated or widespread. If belongings are damp or carry a sewage-like odor, avoid handling and seek qualified help. Damaged materials suggest conditions that warrant closer investigation.
Odor, Mold, and Humidity Clues
Musty odors with or without a visible source
A musty or earthy odor often signals that moisture has lingered in a crawl space. Smell may persist even when you do not see visible growth and may intensify after rain or during muggy periods. While odor alone cannot prove hidden mold or identify a source, it marks a condition worth documenting and exploring.
Note where and when you detect the odor, whether it is stronger in certain areas, and if it changes with weather or time of day. An odor that spikes after rain or during humid days supports a moisture-related hypothesis, while a constant odor hints at sustained dampness. Treat odor as a clue, not a conclusion, and record it alongside other observations.
Visible mold and surface staining
Surface mold or staining on wood, masonry, or insulation indicates that moisture has been available. Common examples include dark or fuzzy patches on wood, speckling on paper-faced insulation, or discoloration beneath vinyl floor coverings in crawl spaces where dampness has persisted. Guidance from the U.S. Environmental Protection Agency (EPA) emphasizes that moisture control is central to mold control and that wet or water-damaged materials left damp for more than a short period can allow mold to develop.
Document the extent and locations with photos and written notes. Avoid disturbing surfaces. Do not attempt to identify species or assess health impacts. Widespread growth or staining across multiple areas or materials is a threshold for a qualified evaluation. Reserve conclusions about sources or duration for a professional who can review the full context.
Damp or sagging insulation
Insulation reveals moisture problems in several ways. Batts can sag or fall when they become wet or lose friction support. Paper or foil facings may discolor where condensation has formed. In some situations, droplets form on the underside of insulation facing cooler surfaces.
Note where insulation looks damp, heavy, misshapen, or stained, and whether nearby wood also appears affected. Wet insulation can hold dampness against wood and may be part of a pattern that includes visible mold, odors, or recurring condensation. Photograph these areas and record ambient conditions at the time. Damp or sagging insulation is a prompt for further investigation, not a reason by itself to remove or replace materials without broader context.
Why humidity clues may show up in the living space above
Moisture in a crawl space can influence the rooms above. Elevated humidity below can migrate upward and contribute to musty odors near floors, closets, or low cabinets. Some flooring materials respond to seasonal humidity swings with gaps, lifting edges, or cupping. These changes may occur even when crawl space surfaces do not look wet at a glance.
If interior clues coincide with humid weather, recent rain, or observed crawl-space dampness, include that timing in your notes. Interior changes do not identify a source by themselves. They form part of a broader picture that also involves exterior drainage, the crawl space environment, plumbing, and any heating, ventilation, and air conditioning (HVAC) influences a qualified professional may need to evaluate.
Wood and Framing Signs to Document
Darkened, stained, or persistently damp wood
Wood often darkens or shows stains after repeated wetting and drying. Look for darker bands along joist edges, sills, or beams, along with drip marks or tidelines on the subfloor. Persistently damp wood may feel cool to the touch and appear darker than surrounding, drier sections. These conditions show contact with moisture but do not prove decay.
Photograph affected members and note nearby clues such as condensation, damp ground, or adjacent plumbing. If the same areas appear damp during different visits or seasons, record that recurrence. Persistence indicates ongoing moisture availability and raises the priority for a qualified evaluation when combined with other signs.
Soft, crumbling, split, or deteriorated wood
Wood that looks soft, crumbly, or deteriorated warrants professional attention. The U.S. Department of Agriculture (USDA) Forest Service distinguishes surface mold and stain from decay fungi. Significant decay tends to develop only when wood moisture has been above the fiber saturation point, roughly 30%, for a sustained period. High humidity alone usually does not wet wood to that level, although it can support surface mold or staining.
Do not probe wood strength or attempt to measure moisture content yourself. Instead, document visible flaking fibers, loss of surface, cracking distinct from normal checking, or edges that look eroded. Combine these notes with observations of nearby dampness, condensation, or liquid water, and seek a qualified evaluation if you suspect widespread deterioration.
Floor-joist, sill, beam, and support-area observations
Location adds critical context. Sills seated on masonry may show capillary wetting, with dampness or stains where wood meets masonry. Joist ends resting in pockets or on ledges can trap moisture and stain more than open spans. Beams above low spots or damp soil sometimes show darker zones or rust on connected metal hardware.
Support conditions matter, too. Adjustable steel columns can rust under damp conditions. Wood posts on concrete piers may display a line of discoloration at the base. Photograph these details and note whether effects cluster near exterior walls, interior piers, plumbing lines, vents, or access points. Location patterns help narrow what to investigate without establishing cause by themselves.
Distinguishing surface mold or stain from possible decay conditions
Surface mold or stain typically appears as a coating or discoloration on the surface. It may look patchy, speckled, or diffuse where humidity or condensation has been available. Possible decay conditions are suggested by changes within the wood itself, including softness, crumbly texture, or loss of section. The difference is that surface mold lies on top, while decay alters the wood.
Homeowners should not attempt to judge wood strength or exact moisture content. Treat widespread mold, pronounced softness, or crumbling as thresholds for professional evaluation. Your role is to capture what is visible, where it appears, how extensive it is, and any related moisture clues so you can communicate effectively without diagnosing structure or recommending repairs.
Floor and Interior Clues Above the Crawl Space
Floors that feel uneven, bouncy, or out of level
Floors above a crawl space can change as moisture conditions shift below. You may notice bounce, unevenness, or sloping transitions. Multiple factors can contribute, including moisture effects on wood elements, changes in subfloor materials, or long-term settlement.
Because several variables influence floor feel, do not assume the crawl space is the only factor. Record where the sensation is strongest, whether it has changed over time, and whether it correlates with wet weather or a particular season. These notes help determine whether a floor system should be evaluated by a qualified professional.
Buckled wood flooring, lifting finishes, and persistent gaps
Wood flooring and related finishes are sensitive to moisture. Buckling, cupping, edge lift, or persistent gaps suggest that humidity or moisture has influenced the materials. Investigations of homes with crawl-space moisture have documented buckled floors and moldy coverings when damp conditions persisted beneath living areas.
Record where floor changes occur and when they appear or worsen. Note whether gaps close in drier seasons and widen during humid months. These signs show that moisture is affecting materials, yet they do not identify the exact pathway or source. Include them in your documentation for later assessment.
Interior odors, stains, or damaged stored items near the floor
Musty odors near closets, base cabinets, or floor-level storage can coincide with crawl-space moisture. Shoes, fabrics, cardboard, and papers stored on or near floors may smell, stain, or warp. In some cases, baseboards or low drywall edges show discoloration where nearby air or materials have been influenced by dampness.
Treat these as context clues. Photograph items where they sit and note whether issues track with wet weather or match observations below. Interior signs complement crawl-space findings and help explain how lower-level conditions may be influencing the living space.
Why a floor symptom does not identify the cause by itself
A change in flooring rarely points to a single cause. Moisture can reach the floor system through liquid entry, capillary movement, vapor diffusion, or humid-air condensation. Plumbing or HVAC components can also affect nearby materials. Without the full picture, no single floor symptom can identify a source.
Use floor changes as prompts to look for matching clues below and outside. If the cause remains unclear or floor performance appears to be worsening, seek a qualified evaluation that considers structure, moisture pathways, and building systems together. Avoid jumping from symptom to conclusion or to a repair decision.
Possible Wood-Destroying-Insect Clues
Mud shelter tubes on foundation walls, piers, or utilities
Thin, earthen tunnels climbing foundation walls, piers, or utilities are a well-known possible sign of subterranean termite activity. These tubes show a pathway insects may have used between soil and wood.
Photograph any tubes and note where they begin and end, along with their approximate length and width. Do not disturb them. Tubes alone do not confirm whether activity is current or historical, and they do not determine treatment needs. A professional pest evaluation is the next step if tubes are observed.
Indoor swarmers, discarded wings, pellets, and visible galleries
Winged insects indoors during certain seasons, small piles of shed wings near windows or lights, fine pellets, and visible galleries or channels in wood can indicate wood-destroying insects. Details vary by species and region, and look-alike debris may come from non-destructive sources.
Photograph what you see and note timing, weather, and location. Avoid assigning a species or deciding whether activity is ongoing. Use these observations to support a request for a qualified pest inspection and to preserve transient clues such as loose wings that are easily lost.
Why possible pest evidence calls for a qualified evaluation
Insect evidence can be subtle or intermittent, and similar-looking signs can arise from different insects or even unrelated causes. Professional inspectors interpret clues in context, examine accessible areas, and recommend next steps when appropriate.
Your role is to recognize possible signs and record them safely. A qualified evaluation is especially important if you suspect framing damage, observe multiple types of clues, or cannot determine whether evidence is current or historical. Avoid assumptions about severity, history, or treatment needs based on one observation.
Avoiding assumptions about activity, history, or treatment needs
A single mud tube or a handful of wings does not prove current activity, just as an old stain does not prove a present leak. Conditions can change, and past evidence may persist for years. The absence of visible signs does not guarantee that concealed issues are not present.
Treat pest-related clues as reasons to pause and seek professional input rather than to reach a conclusion. Document what you can without disturbing evidence, and capture dates, locations, and any related moisture observations that may help a professional interpret the situation.
Outside Conditions That Add Context
Water collecting near the foundation or crawl-space access
The landscape around a house often holds visible clues. After rain, look for water collecting near the foundation, driveway edges, or the crawl-space access door. Water against a wall can track through openings or porous materials and appear inside as dampness or stains. A wet threshold at an access point may indicate a pathway associated with a storm.
Photograph pooling areas, note surface flow direction, and record how quickly puddles disappear after rain. Exterior water against the foundation is an important context clue, though not proof of any single interior issue. Pair these notes with interior observations for a fuller picture.
Roof runoff, low spots, and soil saturation after rain
Watch how roof runoff behaves during a storm. Heavy flows that hit the ground near the house can create splash zones and ruts. Low spots beside walls may pond, and saturated soil can stay spongy for days. These conditions can align with interior dampness, tidelines, or mineral deposits on walls.
Record which sides of the house show these patterns and how intense the rain was when observed. If the same wall inside shows dampness or staining, that alignment strengthens the case for closer investigation of that area. Alignment offers context, not a conclusion.
Access openings, vents, and exterior penetrations to observe
Places where people and services enter the crawl space often allow moisture pathways. Check around access hatches, utility penetrations, and wall openings for streaks, dampness, or signs of pest entry. Even designed air exchange can interact with wind-driven rain and leave marks.
Note gaps, staining, or rust around penetrations. These details help explain potential routes without naming a single cause. Include timing and weather in your notes, especially after storms with wind from a specific direction.
Repeating exterior and interior patterns after wet weather
Repeated patterns after wet weather are especially valuable to record. If an exterior corner ponds water and, after storms, the adjacent interior wall shows dampness, that correlation matters. If indoor odor intensifies on humid days and condensation appears on nearby pipes below, the connection is worth noting.
Paired observations help a qualified assessor focus on likely pathways. Keep correlating signs across seasons. Recurring conditions suggest sustained moisture, while isolated signs may reflect unusual events. In either case, thorough documentation improves the clarity of any evaluation.
Common Moisture Pathways and Why They Matter
Liquid water flow
Liquid water moves by gravity and pressure. In crawl spaces, it may show up as puddles after storms, damp soil in low areas, or silt lines where water previously ran. Plumbing leaks can create localized pooling or dripping in otherwise dry conditions. These direct, visible movements can be photographed and mapped.
Track where liquid water appears, how widespread it is, and how long it persists. Note whether it aligns with rain, snowmelt, or plumbing use. Because liquid water can move quickly and deposit debris, it often leaves clear markings for later documentation, such as tidelines or displaced ground cover.
Capillary suction in porous materials
Capillary action draws moisture upward through tiny pores in materials like concrete, mortar, and some soils. In a crawl space, you may see dampness at the base of masonry walls, darker bands near the bottoms of piers, or a stain where wood meets masonry. Capillary moisture can persist even when no liquid flow is visible.
Record the height and continuity of damp bands and whether they fluctuate with weather. Capillarity can also affect sills and joist ends resting on, or touching, damp masonry. These observations matter because capillary pathways can keep materials damp longer than surface wetting alone.
Vapor diffusion and ground moisture
Water vapor moves from higher to lower vapor pressure and passes through many building materials. In crawl spaces, vapor rising from damp soil or ground cover can raise humidity and dampen surfaces even without visible liquid water. Over time, vapor diffusion can support surface mold or staining on cooler or shaded materials.
Note whether dampness appears without recent rain and whether it coincides with warm, humid weather. Vapor-driven moisture may present as general dampness, stronger odor, or changes to finishes rather than distinct puddles. Distinguishing vapor diffusion from liquid entry helps target questions during a professional assessment.
Humid-air condensation on cooler surfaces
Humid air condenses on cooler materials inside a crawl space. Cold water lines, metal ducts, the underside of insulation, and shaded wood members can develop visible droplets under the right conditions. In mixed or warm climates, field photos commonly show condensation on insulation facings and dampness in portions of joists near cold surfaces.
Link condensation to weather and temperature contrasts. Note whether it occurs mainly in summer, at specific times of day, or near certain components. Condensation is different from leaks or capillary moisture, but its effects can overlap by keeping nearby materials damp.
When Signs of Crawl Space Damage Need Qualified Help
Broad mold growth, extensive water damage, or contaminated water
Seek qualified help if you see widespread visible mold across multiple surfaces or framing members. Also seek help after substantial water events, such as repeated flooding or deep pooling over broad areas. If water may contain sewage or other contaminants, do not enter or disturb the area and contact qualified professionals promptly.
These conditions go beyond basic observation. Professional assessments consider the extent of moisture, material conditions, and safe next steps. Those judgments cannot be made from a single clue or a one-time visit.
Suspected concealed moisture, HVAC involvement, or floor-system concerns
If odor is strong but you cannot find a visible source, if you suspect moisture behind finishes or within assemblies, or if possible heating, ventilation, and air conditioning (HVAC) influences are involved, seek a qualified evaluation. Condensation on ducts or cooling components, or suspected air movement between the crawl space and living areas, may require system-level assessment.
Likewise, if floors feel increasingly uneven or bouncy, or if finishes continue to change in ways that suggest ongoing moisture influence, involve a professional. These scenarios benefit from tools and methods beyond a homeowner’s visual check and help avoid assumptions that could miss concealed conditions.
Possible decay, widespread material damage, or unclear water sources
Suspected wood decay, crumbling members, or large areas of damaged or stained materials should prompt professional attention. An unclear or mixed set of signs, such as dampness appearing in several areas without an obvious pattern, is also a reason to involve an expert who can interpret moisture pathways.
Do not attempt to judge structural capacity or decide whether materials are safe or repairable. The goal is to present clear documentation so a professional can determine appropriate next steps.
Possible wood-destroying-insect evidence
Mud shelter tubes, indoor swarmers or discarded wings, pellets, or visible galleries in wood are all possible signs of wood-destroying insects that call for professional pest evaluation. Do not disturb evidence or apply treatments on your own.
Pest professionals can assess whether signs suggest current or historical activity and advise on appropriate measures if needed. Your photographs, dates, and notes about moisture conditions will inform that evaluation.
A Practical Observation Routine
After rain, snowmelt, or a water event
Visit the crawl space as soon as it is safe after rain or snowmelt. Look for fresh puddles, waterlines on walls or piers, damp soil, and displaced ground cover. Note whether water enters near specific corners, penetrations, or the access door. Check for new mineral deposits or silt trails left as water receded.
Correlate these findings with exterior conditions. Photograph outdoor pooling near the foundation and the corresponding interior areas. This timing captures liquid water pathways at their most visible and strengthens your documentation.
During humid weather
On warm, humid days, check for condensation on pipes, ducts, the underside of insulation, and shaded wood members. Note musty odors and whether insulation feels damp or appears heavier. Watch for fresh rust on metal straps or hangers and for new staining patterns on wood or masonry.
Record the time of day and outdoor conditions, since condensation often varies as temperatures shift. These checks help you separate condensation-driven clues from liquid entry and add valuable context for a later assessment.
Before storing items or making use of space above
If you plan to store belongings near the floor above a crawl space, or if you are noticing floor changes, do a targeted check. Look for general dampness, odors, or discoloration below. Check closets or low cabinets indoors for musty smells or fabric dampness. Note any flooring changes, such as cupping or persistent gaps, that align with humid periods.
These pre-use observations reduce the risk of surprises and help you decide whether to consult a professional before placing items that could be damaged by moisture. They also create a baseline for future comparison.
What to document for an assessment
Good documentation is specific. Record the date, weather, and time for each visit. Photograph each clue wide and close, and label images with locations such as north wall, under kitchen, or near water heater. Note whether the sign is new, recurring, or changing in extent.
Include details that help distinguish moisture mechanisms: puddles and flow paths for liquid water; damp bands or base staining for capillary action; general dampness or odors for vapor diffusion; droplets on cool surfaces for condensation. Add interior clues and exterior context. This package supports a more accurate evaluation without asking you to diagnose the cause.
Frequently Asked Questions
What are the first signs of crawl space damage?
Early signs often include musty odors, isolated puddles or wet soil, light surface mold or staining on wood or insulation, condensation on cold pipes or the underside of insulation, and rust on metal components. Damp or sagging insulation and mineral deposits on masonry are also practical clues. No single sign proves cause or severity, but a cluster of them signals conditions worth documenting and investigating.
Does a musty crawl space mean there is mold or wood rot?
A musty odor suggests moisture has been available and may support surface mold growth, even when nothing is visible. Odor alone does not confirm hidden mold or wood decay, and it does not measure wood strength. Significant decay typically requires wood to remain above the fiber saturation point over time. Treat odor as a prompt to document and consider a qualified evaluation if other clues are present.
Can crawl space moisture affect floors above?
Yes. Elevated humidity and condensation below can contribute to cupping, buckling, edge lift, or persistent gaps in wood flooring and may produce musty odors near the floor. These symptoms do not identify the source by themselves, so pair them with crawl-space and exterior observations before deciding on next steps.
Are mud tubes in a crawl space always a termite problem?
Mud shelter tubes are a recognized possible sign of subterranean termites, yet a tube by itself does not prove current activity or set treatment needs. Tubes can be historical or incomplete, and similar-looking material can mislead. Photograph what you see and request a professional pest evaluation to interpret it in context.
When should crawl space damage be evaluated by a professional?
Seek qualified help for broad visible mold growth, substantial or recurring water damage, water suspected to contain sewage, possible concealed moisture, suspected HVAC involvement, signs suggesting wood decay, potential floor-system concerns, unclear water sources, or possible wood-destroying-insect evidence. These situations require trained assessment to interpret signs and determine appropriate next steps. Your documentation makes that evaluation more effective.
The Bottom Line
Crawl spaces reveal a great deal through careful observation. Signs may include puddles, damp soil, condensation, musty odors, surface mold or staining, rust, darkened or deteriorated wood, sagging insulation, damaged stored items, and interior floor or odor changes. Each clue is useful, yet no single one diagnoses a property or identifies an exact source. Distinguish liquid water, dampness, capillary moisture, vapor diffusion, and condensation, and remember that timing, location, and recurrence add context rather than proof.
Your role is to recognize and document what you can safely see, smell, and photograph, then use that record to support a qualified evaluation when conditions warrant it. Seek professional help for broad visible growth, significant or recurring water issues, water that may be contaminated, suspected hidden moisture, possible HVAC involvement, potential wood decay or floor-system concerns, unclear water sources, or possible wood-destroying-insect evidence. With clear notes and photos, you can communicate observations effectively and help focus an assessment on the most relevant areas without diagnosing the problem or deciding on a repair path yourself.